The Complete Bathroom Chaos Problem
Let me guess: your bathroom counter is covered in products you use daily but can never find when you need them. Your under-sink cabinet is a black hole where cleaning supplies go to die. Your shower has bottles balanced precariously on tiny ledges, constantly falling during every shower. And you’re pretty sure there’s a face cream you bought three months ago that’s lost somewhere in the mess.
If this sounds familiar, you’re dealing with what I call “bathroom storage chaos”—when you have limited space, no built-in organization, and products scattered across multiple zones with zero system.
The good news? You can fix all of this in one afternoon with a complete bathroom organization system that costs under $150 and requires zero drilling, installation, or landlord permission.
I’m going to show you exactly how to organize every zone in your bathroom using products that actually work together, so everything has a designated home and you can find what you need in seconds.
Materials & Tools Used
Here’s the complete system I used to organize a small bathroom from top to bottom:
1. Under-Sink Pull-Out Organizers (2-Pack, White) Buy Now on Amazon

Why you need this: The space under your sink is valuable real estate that’s usually wasted because of awkward plumbing. These pull-out organizers have an L-shaped design that wraps around pipes, giving you two tiers of storage that slide out so you can actually see and access everything. The white powder-coated steel is rust-resistant (important in humid bathrooms), and each tier holds up to 50 lbs. The grid bottom prevents water pooling from damp bottles.
What I used it for: Cleaning supplies, backup toiletries, hair tools, extra toilet paper, and tall bottles on the bottom tier.
2. Countertop Organizer with Drawers (Gold, 5-Tier + 3 Drawers)Buy Now on Amazon**

Why you need this: This is your daily-use command center. The modular design lets you stack or separate tiers, and the reinforced steel frame holds up to 50 lbs—way sturdier than cheap plastic organizers. The three drawers keep small items (cotton rounds, hair ties, samples) contained and dust-free, while the open tiers display your everyday skincare and makeup. I chose the gold finish because it looks more expensive than it is and adds a touch of elegance to basic bathroom storage.
What I used it for: Morning and evening skincare, perfumes, face mists, lip balms, and all the small stuff that usually clutters drawers.
3. 360° Rotating Organizer (Green, 2-Tier) Buy Now on Amazon**

Why you need this: This lazy Susan-style organizer is a game-changer for corner spaces or deep counters where things get pushed to the back and forgotten. The 360° rotation means you can access every product with a simple spin—no digging required. The raised guardrails prevent bottles from sliding off, and the wider spacing between tiers accommodates taller skincare bottles. The green with gold accents adds a pop of color without looking juvenile.
What I used it for: Toners, serums, body lotions, nail polish, and anything I need to grab quickly during my routine.
4. Over-the-Door Shower Caddy (Black, Rustproof) Buy Now on Amazon**
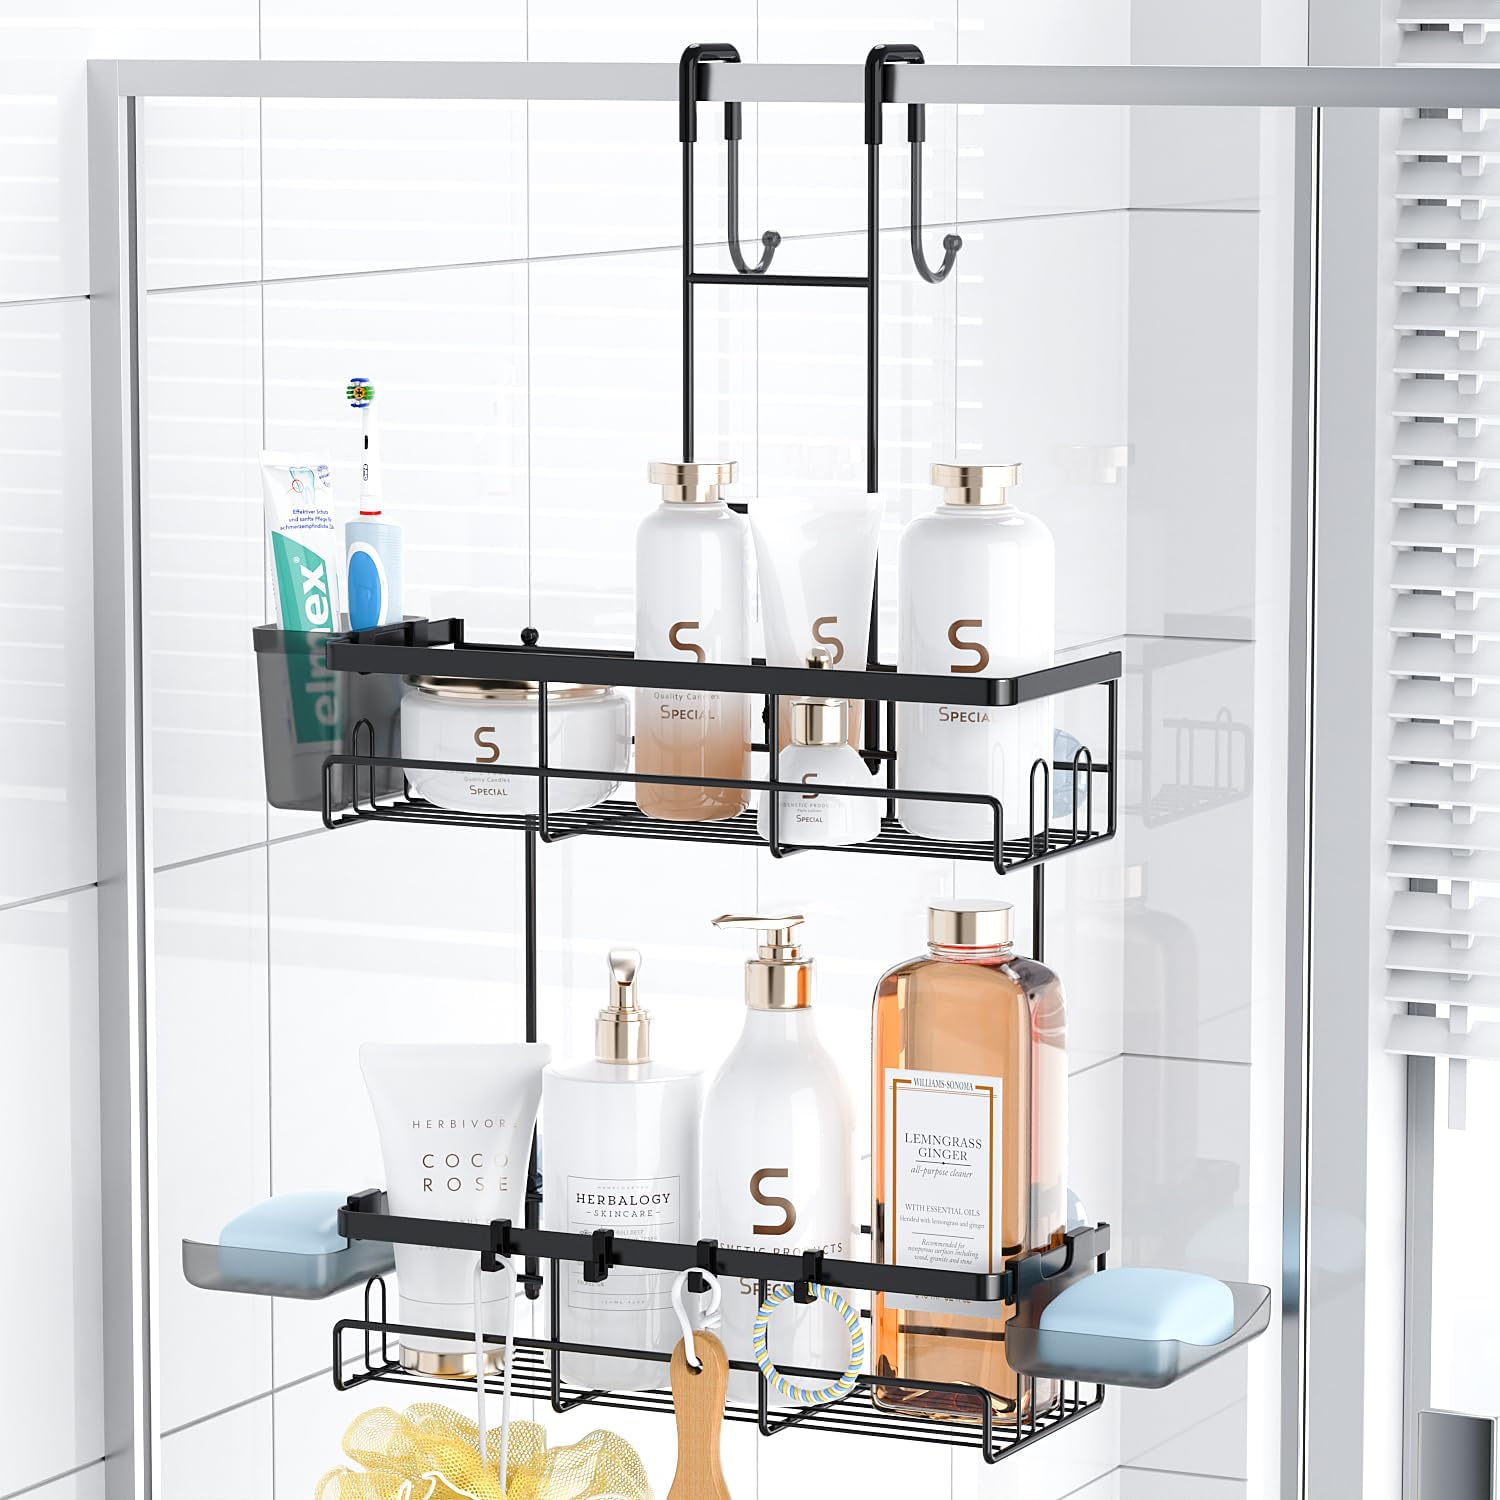
Why you need this: If you don’t have built-in shower shelves (or if yours are tiny and gross), this is your solution. It hangs over your shower door—no drilling, no suction cups that fail after two weeks. The stainless steel is treated with rust-proofing, and the design includes two large shelves, soap holders, razor hooks, and even hooks on the opposite side for towels or robes. The suction cups at the bottom prevent swaying.
What I used it for: Shampoo, conditioner, body wash, face cleanser, razors, loofahs, and a backup bar of soap.
5. Fabric Storage Baskets (3-Pack, Beige/White/Ivory) Buy Now on Amazon**
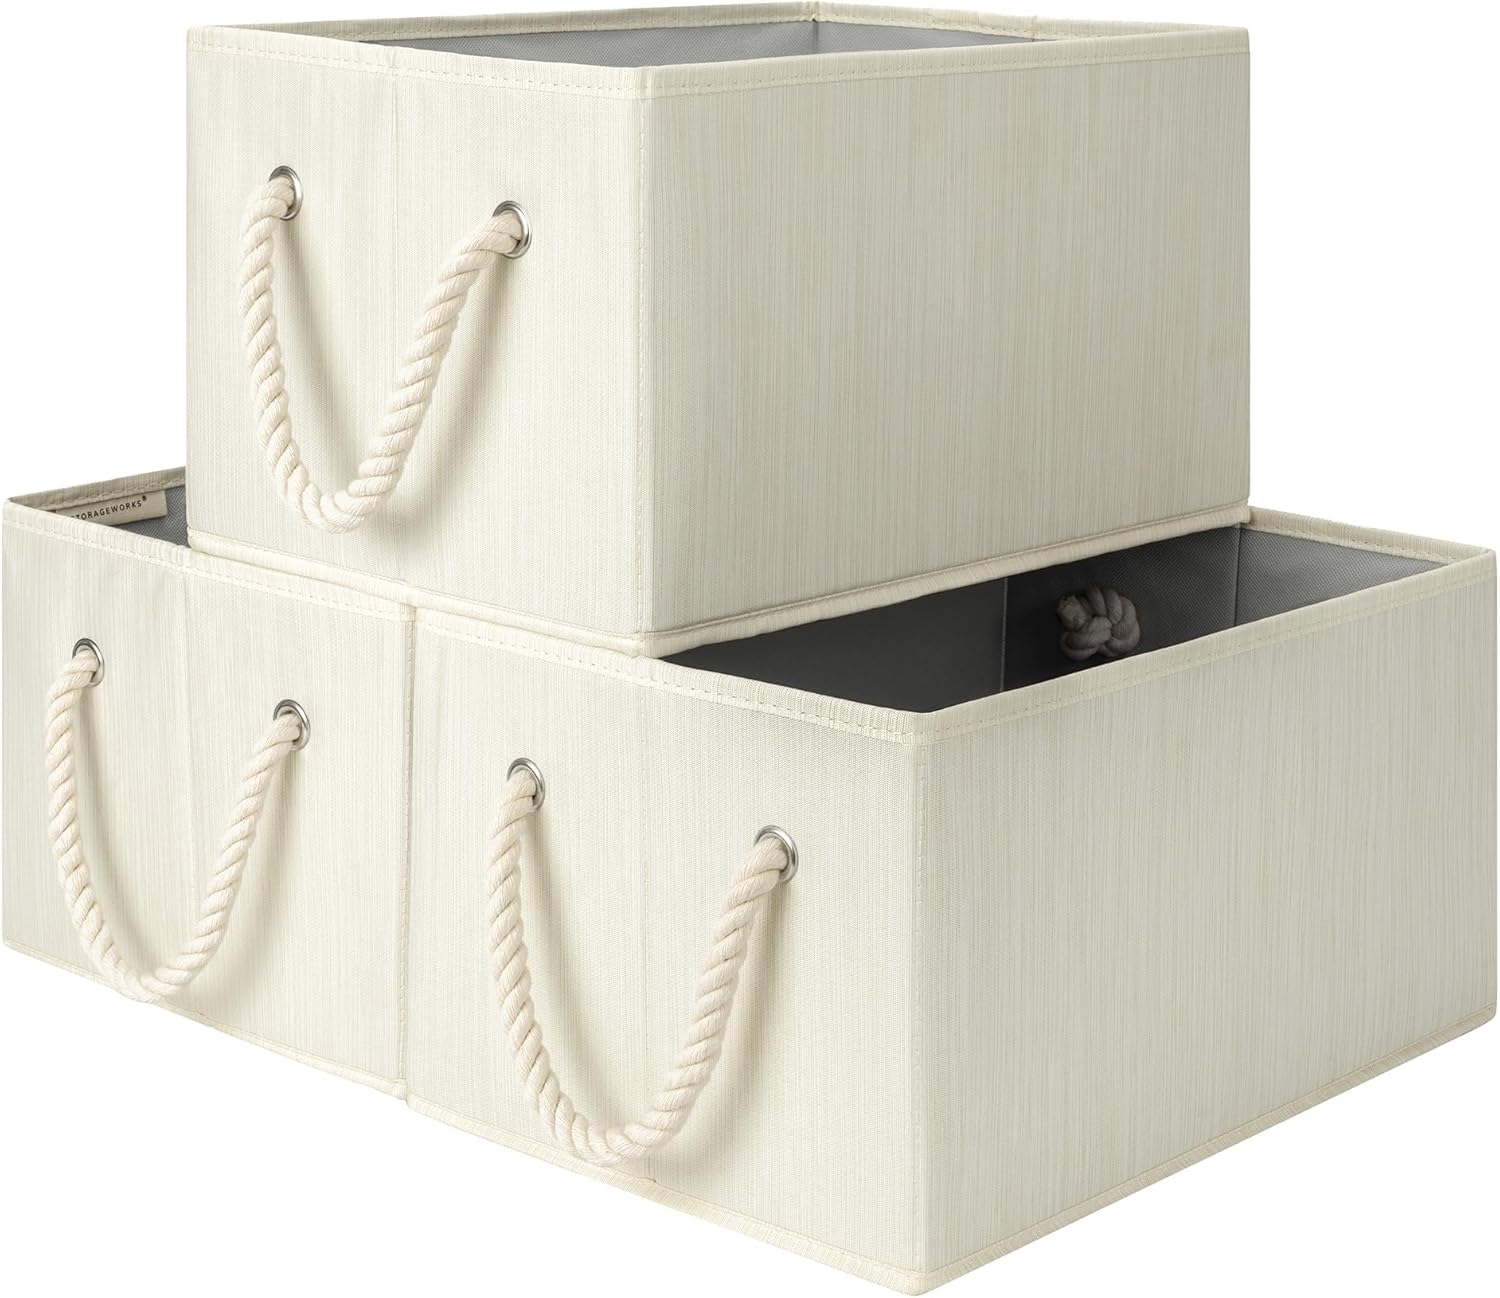
Why you need this: These soft-sided bins are the finishing touch for overflow storage and items that don’t fit in your main zones. The rope handles make them easy to pull from high shelves, and they collapse flat when not in use. The natural fiber blend holds its shape even when filled (supports up to 30 lbs each) and gives off that expensive spa vibe.
What I used it for: Backup products (unopened shampoo, body wash refills), clean washcloths, period supplies, and first-aid items.
Step-by-Step: Complete Bathroom Organization
Step 1: Empty Everything and Sort (15 minutes)
Before you install anything, pull out every single item from your bathroom. Yes, everything—under the sink, in drawers, on the counter, in the shower.
Create four piles:
- Daily use (products you touch every single day)
- Weekly use (products you use a few times a week)
- Backup/overflow (unopened products, refills, extras)
- Trash/donate (expired, duplicates, things you’ll never use)
Be ruthless with the trash pile. That face mask from 2022? Gone. The hotel shampoo collection? Donate it.
This sorting process is crucial because it determines what goes where in your new system.
Step 2: Install the Under-Sink Organizers (5 minutes)
Take your Under-Sink Pull-Out Organizer and unfold them—they come pre-assembled, which is amazing.
Open your cabinet doors and position the first organizer on one side, with the narrow L-shaped section wrapping around your plumbing. The design accounts for pipes, garbage disposals, and weird cabinet configurations.
Press down on the suction cups to secure it, or use the included adhesive strips if your cabinet has a textured bottom. I used suction cups and they’ve held strong for months.
If you have a wider cabinet (22”+ width), install the second organizer on the opposite side. If not, save it for under your kitchen sink.
Load them strategically:
- Bottom tier: Tall bottles (cleaning sprays, extra shampoo, toilet bowl cleaner). This tier has 8” of clearance.
- Top tier: Shorter items you grab frequently (sponges, rubber gloves, small spray bottles, travel-size products).
Pull each drawer out a few times to make sure it slides smoothly. The satisfaction of gliding these out instead of crouching and digging is immediate.
Step 3: Set Up Your Daily-Use Counter Station (5 minutes)
Grab your Countertop Organizer with Drawers and assemble it by inserting the metal tubes into the tray holes. It takes about 60 seconds—no tools needed.
Place it on your bathroom counter or inside a vanity cabinet if you have one. Here’s how I organized mine:
Top 2 tiers (open):
- Back row: Taller bottles (face wash, micellar water, body lotion)
- Front row: Everyday essentials (moisturizer, sunscreen, eye cream)
- Side: Perfume or face mist
Middle tier (open):
- Lip products, hand cream, jewelry you wear daily
Bottom 3 drawers:
- Drawer 1: Cotton rounds, cotton swabs, hair ties
- Drawer 2: Makeup samples, travel-size products, bobby pins
- Drawer 3: Nail clippers, tweezers, small tools
The beauty of this system is that your most-used items are displayed and accessible, while the clutter-prone small stuff is hidden in drawers.
Step 4: Add the Rotating Corner Organizer (2 minutes)
If you have a corner of your counter, a spot next to your sink, or a deep vanity where things get lost, place your 360° Rotating Organizer there.
No assembly required—just set it down and load it up.
I use mine for:
- Bottom tier: Body lotions, hand creams, larger bottles
- Top tier: Face mists, toners, serums I rotate through, nail polish
The ability to spin it and instantly see everything without unloading the front row is incredibly satisfying. It’s also great for shared bathrooms—each person can claim a side.
Step 5: Install the Over-the-Door Shower Caddy (3 minutes)
Take your Over-the-Door Shower Caddy and assemble the two shelves with the connecting rods. It’s intuitive—everything snaps together.
Hang it over your shower door (or the bathroom door if you don’t have a glass shower enclosure). The caddy fits doors up to 1.77” thick.
Press the suction cups at the bottom against the door and push the included adhesive strips into place for extra stability.
Load it up:
- Top shelf: Daily shower products (shampoo, conditioner, body wash)
- Bottom shelf: Backup bottles or less frequently used items (deep conditioner, shaving cream)
- Soap holders: Bar soap, face cleanser bar
- Hooks: Razors, loofahs, washcloths, shower caps
- Opposite side hooks: Towel or bathrobe
The two-tier design with hooks and compartments means you’re not balancing bottles on a tiny corner ledge anymore. Everything has a spot, and the rustproof coating holds up even in steamy showers.
Step 6: Store Overflow in Fabric Baskets (5 minutes)
For everything that doesn’t fit in your main zones, grab your Fabric Storage Baskets.
I use mine like this:
- Basket 1 (under sink or linen closet): Backup toiletries—unopened shampoo, body wash refills, extra toothpaste
- Basket 2 (on a shelf or in a closet): Clean washcloths, hand towels, makeup remover cloths
- Basket 3 (accessible spot): Period supplies, first-aid items, hair masks, face masks
The rope handles make them easy to pull down from high shelves, and they look intentional—not like you just shoved things in a plastic bin.
If you have limited cabinet space, these can sit on top of the toilet tank or on a bathroom shelf and still look polished.
The Result: A Bathroom That Actually Functions
After about 35 minutes of work, here’s what you’ll have:
✅ Under-sink storage that’s visible and accessible—no more crouching and digging
✅ A daily-use station on your counter where everything you need is within arm’s reach
✅ A rotating corner organizer that makes deep or awkward spaces functional
✅ A shower where bottles aren’t falling on your head every time you move
✅ Overflow storage for backups and extras that doesn’t look like clutter
The best part? The entire system cost me about $140, requires zero drilling or permanent installation, and can move with you if you’re renting.
My bathroom counter went from chaotic to spa-like, and I can now find my eye cream in the dark. That’s a win.
Who This System Is For
This complete bathroom organization system works especially well if you:
- Live in a small apartment or rental where built-in storage is minimal or nonexistent
- Are tired of countertop clutter and can never find what you need
- Have an awkward under-sink cabinet with plumbing that makes traditional organizers useless
- Share a bathroom and need separate zones for different people or product categories
- Want a budget-friendly solution (under $150) that looks expensive
- Prefer a no-drill, renter-friendly setup that can move with you
- Have a shower with terrible or no shelving
FAQ
Q: Will the under-sink organizers fit if I have a garbage disposal or large pipes?
A: Yes—the L-shaped design is specifically made for this. The narrow side (4.8” wide) goes near the pipes, and the wide side (8.9” deep) gives you full storage. Just measure your cabinet first: you need at least 14.2” width, 10.6” depth, and 11” height for one organizer. If your plumbing is really bulky, you might only fit one instead of two.
Q: Can I use the shower caddy if I don’t have a shower door?
A: The over-the-door design works best on hinged shower doors or bathroom doors. If you have a sliding glass door or a shower curtain setup, this particular caddy won’t work. In that case, look for a tension pole caddy or adhesive wall-mounted shelves instead.
Q: Do these organizers look cheap or plastic-y in person?
A: Not at all. The under-sink organizers are powder-coated steel (not flimsy wire), the countertop organizer has a reinforced metal frame (not hollow plastic), and the shower caddy is stainless steel with a rust-resistant coating. The fabric baskets have a natural fiber blend that holds its shape. Everything feels more expensive than the price tag suggests.
Q: How do I keep the system organized long-term?
A: The key is returning items to their designated spots after each use. Do a quick 5-minute reset once a week—wipe down surfaces, toss empty bottles, restock from your backup basket. The drawer and basket system makes it easy to maintain because everything has a specific home.
Final Thoughts: Small Spaces, Big Results
You don’t need a massive bathroom or custom built-ins to have an organized, functional space. You just need the right products that work together as a system—not random bins and baskets that don’t address the real problems.
This complete bathroom organization setup solved three major pain points for me: wasted under-sink space, daily-use countertop chaos, and shower bottle juggling. And it did it all for under $150 without requiring tools, drilling, or landlord approval.
Your next step: Pick one zone to tackle this week. If your under-sink cabinet is the biggest mess, start there. If your shower drives you crazy, begin with the caddy. Once you see how much easier one organized zone makes your daily routine, you’ll want to do the whole bathroom.
And if this helped you, save it to your Pinterest board—you’ll want to reference it when you’re ready to organize other spaces in your home.


